Apply the CARP design principles (Contrast, Alignment, Repetition, Proximity) to create healthcare presentations that communicate clearly to diverse audiences (CO-5)
Use Slide Master to establish consistent branding and layout across all slides in an organizational presentation (CO-5)
Prepare a presentation for delivery using Presenter View, speaker notes, and rehearsal timing to ensure confident, professional delivery (CO-5)
Critique a peer's presentation using CARP principles and the 6x6 rule, providing specific feedback on what works and what should be revised (CO-5)
Part 1 of 5
Part 1 of 5 — CARP Design Principles for Healthcare Presentations
Effective presentation design is not about being artistic — it is about communicating clearly. The CARP principles (Contrast, Alignment, Repetition, Proximity) are four foundational design rules that transform cluttered, confusing slides into professional, readable presentations. These principles were popularized by designer Robin Williams and apply universally, from clinic brochures to boardroom slide decks. Mastering CARP will immediately improve the quality of every healthcare presentation you create.
Contrast means making different elements visually distinct so the audience instantly recognizes what is most important. If two elements are different, make them very different — not just slightly different.
Font size contrast – Use a large, bold title (36–44 pt) alongside smaller body text (24–28 pt). The size difference creates a clear visual hierarchy that tells the viewer where to look first.
Color contrast – Place dark text on light backgrounds, or light text on dark backgrounds. Avoid pairing similar colors that make text hard to read. In healthcare, high contrast is especially important for audiences with visual impairments or when presenting in brightly lit clinical environments.
Weight contrast – Use bold for key terms and regular weight for supporting text. This draws the eye to critical information like medication names, safety warnings, or procedure steps.
Shape and size contrast – A large image next to small bullet points creates visual interest and prevents the monotonous appearance of text-only slides.
Alignment means every element on the slide should have a visual connection to another element. Nothing should be placed arbitrarily. Strong alignment creates invisible lines that guide the viewer's eye through the content in a logical path.
Left alignment is the most readable for English text. Align all body text to the same left margin for clean, professional slides.
Center alignment works for titles and short text, but long centered paragraphs are difficult to read because the eye has to search for the beginning of each line.
Avoid placing objects "close to centered" or "almost aligned." Slight misalignments look like mistakes. Use PowerPoint's Align tools (Format > Align) and Smart Guides to snap elements into perfect position.
Repetition means using the same visual elements throughout your presentation: the same fonts, colors, bullet styles, image treatments, and layout patterns. Repetition creates a sense of unity and professionalism — it tells the audience that all slides belong together.
Choose two fonts maximum (one for headings, one for body text) and use them consistently on every slide.
Use the same color palette throughout. In a UMA-branded presentation, this means using navy (#1d6ba6) for headings, teal (#00b4d8) for accents, and dark slate (#2d3748) for body text across every slide.
Apply the same bullet style and spacing to all bulleted lists.
Use the same image treatment (e.g., all photos cropped to the same shape or all images given the same border style).
Proximity means related items should be placed near each other, and unrelated items should be separated by whitespace. Proximity creates visual groupings that help the audience understand the logical structure of your content without reading every word.
Keep a heading close to the content it describes and farther from the preceding section. If a heading is equidistant between two text blocks, it is unclear which one it belongs to.
Group related bullet points together and add extra space between distinct groups to signal a topic change.
Place image captions directly below or beside the image they describe, not across the slide in a disconnected text box.
Principle
Definition
Healthcare Example
Common Mistakes
Contrast
Make different elements visually distinct to establish hierarchy
Large, bold navy title over smaller body text; a bright teal callout box for safety warnings
Using similar font sizes for title and body; low-contrast color combinations
Alignment
Every element should have a visual connection to other elements
All body text left-aligned to the same margin; images snapped to grid using Align tools
Objects placed "approximately" in position; mixing alignment types on one slide
Repetition
Use the same design elements consistently throughout
Same two fonts on every slide; navy headings and teal accents across all training slides
Using a different font or color scheme on each slide; inconsistent bullet styles
Proximity
Group related items together; separate unrelated items with whitespace
Procedure steps grouped into logical phases; captions placed directly under images
Heading equidistant between two text blocks; all content crammed together
Healthcare Connection
Compare two versions of a "Patient Check-In Procedure" slide. Version A has a small title in the same font as the body, text scattered across the slide with inconsistent alignment, six different colors, and bullets with no grouping. Version B has a large bold navy title, left-aligned body text, a consistent blue-and-teal palette, and procedure steps grouped into three logical phases separated by whitespace. Version B is instantly more readable — that is the power of CARP.
Part 2 of 5
Part 2 of 5 — The 6x6 Rule and Color Theory for Healthcare Slides
Beyond the CARP principles, two additional guidelines are essential for creating clear, effective slides: the 6x6 rule for text quantity and color theory for visual communication.
The 6x6 Rule
The 6x6 rule is a widely cited guideline for limiting text on presentation slides: use no more than six bullet points per slide and no more than six words per bullet. While strict adherence is not always practical, the underlying principle is critical — slides should support your message, not replace it. Your slides are a visual aid; the detailed explanation comes from you, the presenter, or from the narration track in a self-running presentation.
Why does this matter in healthcare? Consider a training slide about medication safety. If you place an entire paragraph about each safety step on the slide, the audience will read the slide instead of listening to your explanation. Their attention splits, and retention drops. Instead, use short, keyword-driven bullets on the slide and expand on each point verbally:
Too much text: "Always verify the patient's full legal name by checking their wristband and asking them to state their name and date of birth before administering any medication."
6x6 approach: "Verify patient identity: name + DOB"
The abbreviated bullet prompts your talking point without overwhelming the slide. Detailed information belongs in your speaker notes or printed handouts.
Color Theory for Healthcare Presentations
Color communicates meaning before anyone reads a word. In healthcare contexts, certain colors carry strong associations that you can leverage — or accidentally misuse:
Blue & Navy
Trust, professionalism, stability. Most common in healthcare branding.
Green
Health, growth, safety. Use for positive outcomes and success messages.
Teal & Light Blue
Modern, clean, calming. Great as an accent color that adds energy.
Gold & Warm Tones
Warmth, optimism, human connection. Effective for callouts and highlights.
Red
Urgency, danger, errors. Reserve for critical warnings only — never decorative.
White & Light Gray
Breathing room that prevents visual overload. Use generous whitespace.
Accessibility and Color
Never rely on color alone to convey information. Someone who is color-blind may not distinguish between red (danger) and green (safe) without additional cues like icons, labels, or patterns. WCAG 2.1 AA standards require a minimum contrast ratio of 4.5:1 for normal text and 3:1 for large text. PowerPoint's Accessibility Checker flags low-contrast combinations automatically.
Healthcare Connection
A clinic quality coordinator creates a dashboard slide showing patient satisfaction metrics. She uses navy for the slide header, teal for above-target scores, gold for at-target scores, and soft coral for below-target scores. Each score also includes an upward arrow, checkmark, or downward arrow icon so the meaning is clear to viewers who cannot distinguish the colors — meeting both design and accessibility standards.
▶
10X Your PowerPoint Skills with AI• 12 min
Part 3 of 5
Part 3 of 5 — Slide Master and Custom Layouts
The Slide Master is the behind-the-scenes control center for your presentation's design. Changes made on the Slide Master automatically apply to every slide in the presentation, making it the most powerful tool for ensuring consistency and saving time. For healthcare organizations that produce many presentations — training sessions, department reports, patient education materials — a well-designed Slide Master is essential for maintaining professional branding.
Understanding the Slide Master Hierarchy
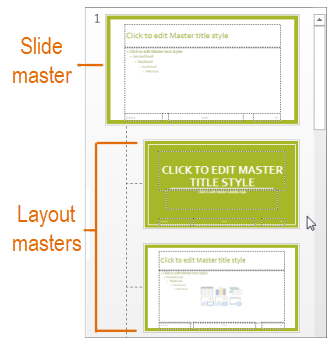
Navigate to View > Slide Master to enter Slide Master view. On the left, you will see a hierarchy of slide thumbnails:
Slide Master (the large thumbnail at the top) – The "parent" slide that controls global design elements: background, fonts, colors, logo placement, and footer information. Any change here cascades to all layouts below it.
Slide Layouts (the smaller thumbnails below) – Individual layout templates that inherit from the Slide Master but can have unique placeholder arrangements. These correspond to the layouts you choose from the Home > New Slide dropdown (Title Slide, Title and Content, Two Content, etc.).
Slide Master view — the master slide controls the look of all slides, while layout masters control individual layouts — Microsoft Support
Editing the Slide Master
In Slide Master view, select the large Slide Master thumbnail and make your global changes:
Place the clinic or university logo in a consistent position (typically the bottom-right or top-left corner). Because it is on the Slide Master, the logo appears on every slide automatically. This ensures branding consistency across all 30, 50, or 100+ slides without any manual repetition.
Select Fonts on the Slide Master tab to choose a heading font and body font that match your organization's branding. For UMA presentations, this might be Merriweather for headings and Roboto or Calibri for body text.
Select Colors to select or customize a theme color palette. Map your organization's brand colors to the accent positions so every chart, SmartArt, and shape automatically uses the correct colors.
Add slide numbers, dates, or footer text (such as "Confidential – Internal Training Only") that appears on every slide. Apply a background color, gradient, or subtle pattern that creates the right mood without competing with content.
Creating Custom Layouts
Customize layouts in Slide Master view to create branded templates for your organization — Microsoft Support
If the built-in layouts do not meet your needs, create a custom layout. In Slide Master view, select Insert Layout on the Slide Master tab. A new blank layout appears in the hierarchy. Add placeholders by selecting Insert Placeholder and choosing the type (Content, Text, Picture, Chart, Table, SmartArt, Media, or Online Image). Position and size the placeholders, then rename the layout by right-clicking and selecting Rename Layout.
Custom layouts are valuable when your organization uses a recurring slide format. For example, a healthcare training department might create a custom layout called "Case Study" with a large picture placeholder on the left for a patient scenario image, a text placeholder on the upper right for the description, and a content placeholder on the lower right for discussion questions.
Closing Slide Master View
When you have finished editing, select Close Master View on the Slide Master tab to return to Normal view. All slides in your presentation now reflect the changes you made. Any new slides you add will inherit the updated Slide Master design and have access to your custom layouts.
Healthcare Connection
A clinic administrator creates a branded Slide Master for the organization: the clinic's logo in the bottom-right corner, a navy (#1d6ba6) header bar at the top of every slide, Inter font for headings, Calibri for body text, and a custom "Case Study" layout with a patient scenario structure. She saves this as a .potx template file. Now every staff member who creates a presentation starts with consistent, professional branding — no manual formatting required.
Part 4 of 5
Part 4 of 5 — Presenter View, Rehearsal, and Delivery Preparation
Creating great slides is only half the job — delivering the presentation effectively is equally important. PowerPoint provides tools that help you prepare, practice, and deliver with confidence. For healthcare professionals who present to colleagues, patients, or leadership, these tools make the difference between a nervous, disorganized delivery and a smooth, professional one.
Presenter View
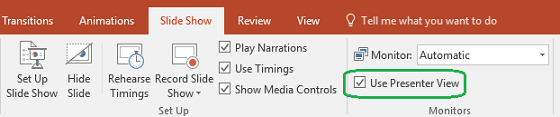
Presenter View is a dual-screen feature that shows the audience the slide show on one screen (typically a projector or monitor) while showing the presenter a private control panel on their own screen. To enable Presenter View, go to Slide Show tab and check Use Presenter View.
Enable Presenter View from the Slide Show tab to see your notes, current slide, and next slide while presenting — Microsoft Support
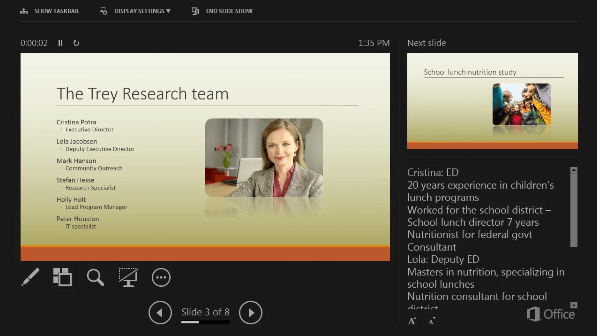
When you start the slide show, the audience sees only the current slide in full screen, while your screen displays:
The current slide – A large preview of what the audience is seeing.
The next slide – A smaller preview so you know what is coming and can transition smoothly.
Timer and clock – Shows how long you have been presenting and the current time, helping you stay on schedule.
Speaker notes appear in a resizable text area on your screen, eliminating the need for printed note cards. Effective speaker notes should include:
Key talking points – Brief reminders, not full paragraphs.
Statistics and citations – Specific numbers or regulatory citations you want to mention without cluttering the slide.
Transition phrases – How you plan to move from one topic to the next.
Anticipated questions – Common questions with prepared responses.
Timing cues – Notes like "You should be at the 10-minute mark here."
Presenter View includes interactive tools for your presentation:
Navigation controls – Arrows to advance or go back, a slide grid to jump to any slide, and zoom tools to magnify specific areas.
Pen and laser pointer tools – Draw on slides or point to specific elements during your presentation. Annotations can be saved or discarded after the show.
Subtitles toggle – Enable real-time subtitles that display your spoken words at the bottom of the audience's screen, supporting accessibility and multilingual audiences. This feature is especially valuable in healthcare settings with diverse patient populations and staff.
Presenter View — see your notes, the current slide, and a preview of the next slide — Microsoft Support
Rehearse Timings
The Rehearse Timings feature (Slide Show tab > Rehearse Timings) lets you practice your presentation while PowerPoint records how long you spend on each slide. A small timer appears in the upper-left corner as you advance through the slides at your natural pace.
Rehearsal tips for healthcare presentations:
Practice in the actual room where you will present, if possible. Familiarity with the space reduces anxiety.
Time yourself to ensure you fit within your allotted slot. Healthcare training sessions often have strict time limits due to clinical scheduling.
Speak at a measured pace, especially when introducing medical terminology or complex procedures.
Plan pauses after key slides to allow time for questions or audience reflection.
If your rehearsed time exceeds the allotted time, identify slides that can be condensed or moved to a handout.
Healthcare Connection
Healthcare Connection: A charge nurse presents a hand hygiene compliance update to her unit. She uses Presenter View to reference her speaker notes (including CDC compliance statistics and departmental data) without turning away from the audience. The timer in Presenter View helps her stay within the 15-minute slot before shift change. After the presentation, she uses the pen tool to circle a specific area of the compliance chart in response to a colleague's question.
▶
Record and Export Video in PowerPoint• 10 min
Part 5 of 5
Part 5 of 5 — Printing, Exporting, and Presentation Etiquette
Presentations live beyond the slide show. Healthcare professionals frequently need to print handouts, export files in different formats, and follow professional etiquette standards for effective delivery. This section covers the final steps that take your presentation from the screen to the audience.
Printing Options
Navigate to File > Print to access PowerPoint's print options. Under Settings, the Print Layout dropdown offers several formats:
Full Page Slides – One slide per page. Best for reviewing your own work or creating poster-sized prints.
Notes Pages – One slide per page with speaker notes printed below. Ideal for a presenter's script or sharing training documentation.
Outline – Prints only text content in outline format. Useful for reviewing structure and content flow.
Handouts – Multiple slides per page (1, 2, 3, 4, 6, or 9). The 3-slides-per-page layout includes lined space for audience note-taking — the most popular choice for training handouts.
Exporting Presentations
PowerPoint can export your presentation in multiple formats to meet different distribution needs:
Creates a non-editable document that preserves your exact layout. PDFs are ideal for emailing to staff, uploading to a learning management system, or posting on a clinic intranet. Every viewer sees the same design regardless of whether they have PowerPoint installed.
Exports the presentation as a video file with your recorded narration and slide timings. Choose from Ultra HD (4K), Full HD (1080p), HD (720p), or Standard (480p). Videos can be uploaded to YouTube, a clinic's website, an LMS, or played on waiting room screens.
A special format that opens directly in Slide Show mode (no editing interface). Perfect for kiosk-style displays where you want viewers to see only the presentation, not the editing tools. Ideal for break room displays or unattended lobby presentations.
Animated GIF exports slides as a looping animation. Useful for embedding a brief visual overview in an email or web page. Images (JPEG/PNG) export each slide as an individual image file, useful for social media posts, website content, or incorporating slides into other documents.
Export Format
Extension
When to Use in Healthcare
PDF
.pdf
Email distribution to staff, LMS uploads, patient handouts, clinic intranet posting
Kiosk displays in lobbies or break rooms, unattended self-running training loops
Animated GIF
.gif
Email newsletters, internal communications, brief visual summaries of processes
Images
.jpg / .png
Individual slides for social media, website content, embedding into Word documents
Notes Pages
Paper / PDF
Presenter scripts, training documentation for compliance files, detailed reference
Presentation Etiquette and Delivery Best Practices
Professional presentation delivery goes beyond the slides themselves. Follow these etiquette guidelines for healthcare settings:
Know your audience – A presentation for physicians uses different terminology and depth than one for administrative staff or patients. Adapt your language accordingly.
Arrive early and test your technology – Connect your laptop to the projector, test audio/video playback, and verify that Presenter View works correctly. Technical difficulties erode credibility.
Begin with an agenda – A brief overview slide tells the audience what to expect, how long the presentation will take, and when questions will be addressed.
Maintain eye contact – With Presenter View, your notes are on the screen in front of you, so you never need to turn your back to read from the projected slide.
Pace yourself – Allow time for questions after key sections. In clinical training, staff often have immediate practical questions.
End with a clear call to action – "Questions?" is not a strong ending — "Starting Monday, use the new check-in procedure outlined today" gives the audience a clear takeaway.
Distribute materials after, not before – If you hand out printed slides before presenting, the audience reads ahead instead of listening.
Healthcare Connection
Healthcare Connection: After completing a staff training presentation on the new patient intake process, the training coordinator exports the presentation as a PDF for the clinic's shared drive, prints 3-per-page handouts with note-taking lines for attendees, and saves a .ppsx version to display in the break room. She also exports a 1080p MP4 video with narration for remote employees to view through the LMS on their own schedule.
Slide Clinic: Diagnose the Design Problem
For each poorly designed healthcare slide scenario below, identify the CARP principle being violated and select the correct fix.
Low Contrast Text
Slide 1 of 5
★ 0/0
What is the best fix for this slide?
0/5
Slides Diagnosed Correctly
Knowledge Check
A healthcare trainer reviews a presentation slide and notices the following issues: the title is the same size and weight as the body text, three different fonts are used on one slide, and a bullet list about safety procedures is mixed with unrelated contact information without any spacing. Which CARP principles are being violated?
Correct! Three CARP principles are being violated: Contrast (the title and body text are the same size/weight, so nothing stands out), Repetition (three different fonts break consistency), and Proximity (safety procedures and contact information are mixed together without spacing). Fixing these would mean making the title larger/bolder, using a maximum of two fonts consistently, and separating the safety content from the contact information with whitespace.
Not quite. The correct answer is Contrast, Repetition, and Proximity. Contrast is violated (title same size as body), Repetition is violated (three different fonts), and Proximity is violated (unrelated items mixed together without spacing). Alignment is not specifically described as an issue in this scenario.
Knowledge Check
A clinic wants its logo to appear in the bottom-right corner of EVERY slide in a 30-slide training presentation. What is the MOST efficient way to accomplish this?
Correct! Inserting the logo on the Slide Master is the most efficient approach because any element placed on the Slide Master automatically appears on every slide that uses layouts derived from that master. All 30 existing slides immediately display the logo, and any new slides added later will also include it.
Not quite. The best approach is inserting the logo on the Slide Master. Any element on the Slide Master automatically appears on every slide. Copying to 30 slides is error-prone, the first slide only affects that slide, and the Notes Pane is not visible to the audience.
Knowledge Check
A health educator has created a narrated PowerPoint training on infection control procedures. Remote staff across three clinic locations need to complete this training on their own schedule through the organization's learning management system (LMS). Which export format is BEST suited for this purpose?
Correct! Exporting as a 1080p MP4 video is the best choice because it preserves the narration, slide timings, and visual design in a universally playable format that can be uploaded to any LMS. Staff can watch the training on their own schedule from any location.
Not quite. The best format is 1080p MP4 video. It preserves narration, slide timings, and design in a universally playable format for any LMS. Printed handouts cannot convey narration, .ppsx requires PowerPoint, and JPEG images lose narration and sequential flow.
Lesson 3.3 Summary
The CARP principles (Contrast, Alignment, Repetition, Proximity) are the foundation of professional slide design.
Follow the 6x6 rule: no more than 6 bullet points with 6 words each — slides support your message, not replace it.
Use color intentionally: blue for trust, green for positive outcomes, red only for critical warnings — and never rely on color alone (WCAG 4.5:1 contrast ratio).
The Slide Master controls global design (logo, fonts, colors) so every slide is automatically branded and consistent.
Presenter View shows your notes, next slide, and timer while the audience sees only the current slide.
Rehearse Timings records your practice pace to ensure you stay within your allotted time slot.
Export as PDF for distribution, MP4 for LMS video training, and .ppsx for unattended kiosk displays.