Given a healthcare communication need, create a new Word document from a blank page or template and enter formatted text using efficient navigation techniques (CO-4)
Save a completed healthcare document in .docx, .pdf, and .rtf formats, selecting the appropriate format based on the document’s intended audience and use (CO-4)
Organize Word documents into a logical folder structure using healthcare naming conventions to ensure team-wide accessibility (CO-2)
Evaluate which Word template and file format best fits a given clinical scenario, justifying the choice based on editing needs and distribution requirements (CO-4)
Part 1 of 6
Part 1: Welcome to Microsoft Word — The Healthcare Professional’s Writing Tool
Microsoft Word is the most widely used word processing application in the world, and it's an essential tool for healthcare professionals. Whether you're drafting a patient referral letter, composing a memo about new office procedures, creating a report for your supervisor, or preparing educational materials for patients, Word provides the features and flexibility you need to produce clear, professional documents.
In healthcare settings, accurate and well-organized documentation is not just a professional courtesy — it is a critical component of patient care and regulatory compliance. Medical offices, clinics, hospitals, and health systems rely on standardized documents for everything from internal communication to patient-facing materials. Learning to create these documents efficiently and correctly is one of the most practical skills you will gain in this course.
The Word Interface
When you first open Microsoft Word, you're greeted by the Start screen. Once you open or create a document, you'll see the main Word workspace, which includes:
☰
☰ The Ribbon
Wide toolbar at the top organized into tabs: Home, Insert, Design, Layout, References, Mailings, Review, and View.
⚡
⚡ Quick Access Toolbar
Small, customizable toolbar above the Ribbon with one-click access to Save, Undo, and Redo commands.
📄
📄 The Document Area
The large white workspace in the center where you type and edit your document content.
📊
📊 The Status Bar
Bottom bar showing page number, word count, language, view buttons, and zoom slider.
📏
📏 The Ruler
Displayed along the top and left edges for setting margins, indentation, and tab stops.
The Home tab in Word provides quick access to common formatting tools and the Styles gallery — Microsoft Support
Take a moment to familiarize yourself with these components. In a busy medical office, knowing exactly where to find the tool you need saves valuable time — especially when a provider is waiting for a document to be completed.
Part 2 of 6
Part 2: Creating a New Document — Blank Documents and Templates
Every document in Word starts with one decision: Do you begin from a blank page or use a template? Both approaches are valuable, and healthcare professionals use each regularly.
Starting with a Blank Document
To create a blank document, open Word and select Blank document on the Start screen, or press Ctrl+N at any time while Word is open. This gives you a clean, empty page with default formatting (typically Calibri 11pt font, single spacing, and 1-inch margins). A blank document is ideal when you need full control over the content and layout — for example, when composing a one-time memo to clinic staff about updated scheduling procedures.
Using Templates
Templates are pre-designed document layouts that include formatting, placeholder text, and sometimes graphics. To access templates, select File > New and browse or search the available options.
In healthcare settings, templates are especially valuable because they help ensure consistency and compliance. Common healthcare templates include:
Professional letters — For referral letters, appointment confirmations, and insurance correspondence
Memos — For internal office communications about policy changes, meeting agendas, or safety announcements
Fax cover sheets — Still used in many medical offices for transmitting patient records between facilities
Flyers and brochures — For patient education, health awareness campaigns, and community outreach events
Reports — For clinical summaries, quality improvement reports, and administrative reviews
When you select a template, Word creates a new document based on that template — the original template file remains unchanged, so you can use it again and again. This is particularly important in healthcare offices where the same form or letter format is used repeatedly with different patient or employee information.
Healthcare Scenario
Imagine you are a medical office assistant at Sunrise Family Practice. Your office manager asks you to draft a memo announcing that the clinic will be closed next Friday for a staff training day. You open Word, search for "memo" in the template gallery, and select a professional memo template. The layout, headings, and formatting are already in place — you simply fill in the details. Within minutes, you have a polished, professional document ready for distribution.
▶
Microsoft Word Tutorial for Beginners• Kevin Stratvert • 20 min
Part 3 of 6
Part 3: Entering, Selecting, and Navigating Text
Once you have a document open, you are ready to begin entering and working with text. The blinking vertical line in the document area is your insertion point (also called the cursor). When you type, characters appear at the insertion point and it moves to the right. Pressing Enter starts a new paragraph, and pressing Tab inserts a tab character for indentation.
When entering text in Word, keep these important practices in mind:
Do not press Enter at the end of every line. Word automatically wraps text to the next line when it reaches the margin. Press Enter only when you want to start a new paragraph.
Use one space after periods. Modern typography and most healthcare style guides recommend a single space between sentences.
Let AutoCorrect help you. Word automatically corrects common misspellings and capitalizes the first letter of sentences. Customize under File > Options > Proofing.
Before you can format, move, copy, or delete text, you must first select it. Word offers multiple selection techniques:
Click and drag — Position your cursor at the start, hold down the left mouse button, and drag to the end. This is the most intuitive method for selecting specific passages.
Double-click — Selects a single word. Useful when you need to change a specific medical term or capitalize a drug name.
Triple-click — Selects an entire paragraph. Handy when you want to move or delete a whole paragraph of instructions.
Ctrl+A — Selects all text in the document. Use this when you need to change the font or spacing for the entire document at once.
Shift+Click — Click at the beginning, then hold Shift and click at the end. Everything between the two clicks is selected.
Ctrl+Shift+Arrow keys — Select text one word at a time using the keyboard. Efficient for precise selection without using the mouse.
Efficient navigation is critical when working with longer healthcare documents. Word provides powerful navigation shortcuts:
Ctrl+Home — Jump to the beginning of the document
Ctrl+End — Jump to the end of the document
Ctrl+F — Open the Find pane to search for specific text (e.g., finding every mention of a medication name)
Ctrl+G — Go to a specific page, section, or bookmark
Page Up / Page Down — Scroll up or down one screen at a time
In a healthcare environment, the ability to quickly navigate and select text is essential. Imagine you are updating a 15-page clinic procedures manual — using Ctrl+F to locate every reference to an outdated policy number is far more efficient than reading through every page manually.
Essential Keyboard Shortcuts for Microsoft Word
Shortcut
Action
Healthcare Use Example
Ctrl+N
Create a new blank document
Start a new patient referral letter
Ctrl+O
Open an existing document
Open a saved insurance form template
Ctrl+S
Save the current document
Save progress on a clinical report
Ctrl+Z
Undo the last action
Reverse an accidental deletion in a memo
Ctrl+Y
Redo the last undone action
Restore text you just undid
Ctrl+C
Copy selected text
Copy a medication list to another document
Ctrl+X
Cut selected text
Move a paragraph to a different section
Ctrl+V
Paste copied or cut text
Paste an address block into a referral letter
Ctrl+A
Select all text in the document
Select the entire document to change font
Ctrl+F
Open Find pane
Search for a specific diagnosis code
Ctrl+H
Open Find and Replace
Replace an old provider name throughout a document
Ctrl+P
Print the document
Print a patient information sheet
Ctrl+Home
Move to the beginning of the document
Jump to the top of a long policy manual
Ctrl+End
Move to the end of the document
Jump to the signature line at the end
Knowledge Check
Which component of the Microsoft Word interface is the wide toolbar at the top of the screen, organized into tabs like Home, Insert, and Design?
Correct! The Ribbon is the wide toolbar organized into tabs (Home, Insert, Design, Layout, References, Mailings, Review, View) at the top of the Word window. Each tab contains groups of related commands. The Quick Access Toolbar is the small, customizable toolbar above the Ribbon. The Status Bar is at the bottom of the window, and the Ruler is along the top and left edges of the document area.
Not quite. The correct answer is The Ribbon. It is the wide toolbar organized into tabs (Home, Insert, Design, Layout, etc.) at the top of the Word window. The Quick Access Toolbar is a small toolbar above the Ribbon, the Status Bar is at the bottom, and the Ruler is along the edges of the document area.
Part 4 of 6
Part 4: Basic Editing — Cut, Copy, Paste, Undo, and Redo
Editing is where you refine your document — moving text from one place to another, correcting mistakes, and rearranging content for clarity. Word provides a robust set of editing tools that every healthcare professional should master.
The Clipboard: Cut, Copy, and Paste
The clipboard is a temporary storage area that holds text or other content you have cut or copied. The three core clipboard operations are:
Copy (Ctrl+C) — Duplicates the selected text and places it on the clipboard. The original text remains in place. Use this when you need the same information in multiple locations — for instance, copying a patient's full name and date of birth into several different forms.
Cut (Ctrl+X) — Removes the selected text from the document and places it on the clipboard. Use this when you want to move text from one location to another — for example, relocating a section of instructions from the middle to the beginning of a patient handout.
Paste (Ctrl+V) — Inserts the clipboard contents at the current insertion point. You can paste the same content multiple times without re-copying it.
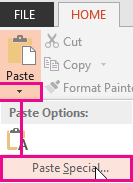
Word also offers Paste Special options when you select the small arrow below the Paste button on the Home tab. These options let you choose how pasted content is formatted — keeping the source formatting, merging with the destination formatting, or pasting as plain text. In healthcare documentation, Paste as Plain Text is often useful when copying information from a website or electronic health record (EHR) system, because it strips out unwanted formatting.
The Paste dropdown reveals Paste Special options for controlling format — Microsoft Support
Undo and Redo
Everyone makes mistakes — and in a fast-paced medical office, accidental edits happen frequently. Word's Undo and Redo functions are your safety net:
Undo (Ctrl+Z) — Reverses your most recent action. You can press Ctrl+Z multiple times to undo several actions in sequence. You can also select the dropdown arrow next to the Undo button on the Quick Access Toolbar to see a list of recent actions and undo multiple steps at once.
Redo (Ctrl+Y) — Reapplies an action you just undid. If you undo too many steps, Redo brings them back one at a time.
Think of Undo as your "safety net" when working on important healthcare documents. If you accidentally delete a paragraph from a policy document or paste the wrong text into a referral letter, a quick Ctrl+Z instantly restores your work. Developing the habit of using Undo regularly will save you time and reduce stress in your daily workflow.
Pro Tip
Pro Tip: In healthcare documentation, Paste as Plain Text is your best friend when copying text from an EHR or website into a Word document. It strips out unwanted formatting, fonts, and styles, giving you clean text that matches your document’s design.
▶
How to Use Microsoft OneDrive• 21 min • Cloud file saving and collaboration
Part 5 of 6
Part 5: Saving Your Work — Save, Save As, and File Formats
Saving your work is one of the most important habits you will develop as a computer user. In a healthcare environment, losing an unsaved document can mean repeating hours of work — or worse, losing critical information that affects patient care or compliance. Word offers two primary save commands, each serving a different purpose.
Save vs. Save As
Save (Ctrl+S) updates the current file with your latest changes. If the file has already been saved once, pressing Ctrl+S simply overwrites the previous version. If the document has never been saved (it is a new, untitled document), Word will prompt you to choose a file name and location — essentially performing a Save As automatically.
Save As (F12 or File > Save As) allows you to save the document with a new name, in a new location, or in a different file format. Save As creates a copy of the document, leaving the original unchanged. This is essential in healthcare settings when you need to create variations of the same document — for example, saving a generic patient instruction sheet with a specific patient's name, or creating a PDF version of a Word document for emailing to a patient.
Pro Tip
Develop the habit of pressing Ctrl+S every few minutes while working on a document. This simple habit prevents data loss from unexpected computer shutdowns, software crashes, or power outages — all of which happen in busy healthcare environments. Word also offers AutoRecover, which automatically saves a recovery version of your document at regular intervals (typically every 10 minutes). You can adjust this interval under File > Options > Save.
Understanding File Formats
Word can save documents in multiple formats, and choosing the right format matters — especially in healthcare where documents are shared between different offices, systems, and platforms. Understanding when to use each format is a key professional skill.
The default Word format. Fully editable with all formatting, images, and features preserved. Use this for documents that need ongoing editing — clinic policy documents, referral letters, internal memos, and any document that multiple staff members may update.
Non-editable, universally viewable. Preserves exact formatting across all devices. Ideal for patient information sheets, forms for email distribution, compliance documents, and any file where you need to prevent accidental editing.
Compatibility format for older systems. Use when sharing files with offices running older software that cannot open .docx files.
RTF (.rtf) — Basic formatting preserved. Compatible across nearly all word processors. Useful for transferring formatted text between different software applications.
Plain Text (.txt) — Text only, no formatting, images, or special features. Universal compatibility. Sometimes used for exporting data for import into electronic health record (EHR) systems.
Formatted for display in a web browser. Use when creating content for the clinic intranet or patient portal.
Sharing files with a partner clinic using older software
PDF
.pdf
Non-editable, universally viewable
Patient info sheets, compliance documents, emailed forms
Rich Text Format
.rtf
Cross-platform text with basic formatting
Transferring formatted text between different software
Plain Text
.txt
Text only; universal compatibility
Exporting data for import into EHR systems
Web Page
.html
Display in a web browser
Creating content for clinic intranet or patient portal
Knowledge Check
A medical office assistant needs to update a clinic policy document from 2025 and keep the original file unchanged. Which action should they use?
Correct! Save As (F12 or File > Save As) allows you to save the document with a new file name, creating a copy while leaving the original unchanged. This is the correct approach when updating an existing healthcare document because it preserves the original version for reference or compliance purposes. Simply pressing Ctrl+S (Save) would overwrite the original file.
Not quite. The correct answer is Save As (F12). It allows you to save the document with a new file name, creating a copy while leaving the original unchanged. This preserves the previous version for reference or compliance, which is critical in healthcare settings.
Part 6 of 6
Part 6: Printing, Print Preview, and File Management
Even in an increasingly digital healthcare environment, printing remains a daily necessity. Patient consent forms, prescription labels, referral letters, and office signage all require printed output.
Print Preview
Before sending a document to the printer, always review it in Print Preview. Access it by pressing Ctrl+P or selecting File > Print. The preview pane on the right shows exactly how the document will appear on paper. Review for:
Correct margins and page orientation (portrait vs. landscape)
Proper page breaks — text should not be cut off awkwardly between pages
Headers and footers displaying correctly
Images positioned where you expect them
The correct number of pages
Print Settings
The Print screen also gives you control over printer selection, page range, number of copies, collation, and duplex printing.
Printer selection — Choose which printer to use (important in offices with multiple printers for different purposes, such as a color printer for patient handouts and a black-and-white printer for internal documents)
Page range — Print all pages, a specific range (e.g., pages 2–4), or just the current page
Number of copies — Specify how many copies to print
Collation — When printing multiple copies of multi-page documents, collation keeps the pages in order
Duplex printing — Print on both sides of the paper to save resources
File Management for Word Documents
Good file management is essential in healthcare offices that generate a high volume of documents. Apply these practices:
Use descriptive file names — Include the document type, topic, and date. For example: Memo_StaffTraining_2026-02-15.docx or PatientHandout_DiabetesManagement_v2.docx
Organize files in folders — Create a logical folder structure such as Documents > Memos > 2026 or Patient Materials > Handouts
Use version naming — When revising documents, save new versions with version numbers (v1, v2, v3) or dates rather than overwriting the original
Back up important files — Save copies to OneDrive, a USB drive, or your organization's network drive
Healthcare Scenario
Healthcare Scenario: You have been asked to update the clinic’s patient intake form. You open the existing file PatientIntakeForm_2025.docx, make your edits, and then use Save As to save it as PatientIntakeForm_2026.docx. You also save a PDF copy for distribution to the front desk staff.
Putting It All Together
In this lesson, you have learned the essential skills for creating documents in Microsoft Word — from navigating the interface and creating new documents, through entering and selecting text, editing with clipboard operations, and saving in the right format. These foundational skills are the building blocks for everything you will do in Word throughout the rest of this course and in your healthcare career. In the next lesson, you will build on this foundation by learning to format your documents with professional fonts, colors, spacing, tables, and graphics to create documents that are not only accurate, but visually polished and easy to read.
Ribbon Explorer: Discover Word's Toolbox
Click each tab to explore the Word Ribbon and discover healthcare-specific uses for every tool group
Clipboard
Cut, Copy, Paste, Format Painter
Copy formatted text between patient documents
Font
Font family, size, bold, italic, color
Bold allergy alerts, use 14pt for patient handouts
Paragraph
Alignment, spacing, bullets, numbering
Numbered steps in procedure manuals
Styles
Quick Styles gallery for consistent headings
Heading 1 for policy sections, Normal for body text
Link to online drug references in training documents
Margins
Set page margins (Normal, Narrow, Wide)
Narrow margins for forms to maximize print space
Orientation
Portrait or Landscape
Landscape for wide scheduling grids
Size
Paper size (Letter, Legal, Custom)
Legal size for compliance documents
Columns
Split text into 2–3 columns
Two-column layout for patient newsletters
Spelling & Grammar
Check and correct errors
Catch errors before sending patient letters
Track Changes
Show edits from collaborators
Review policy updates from multiple departments
Comments
Add notes without changing text
Supervisor feedback on draft reports
Word Count
Count words, characters, paragraphs
Meet grant proposal word limits
Read Mode
Distraction-free reading view
Review long policy documents comfortably
Print Layout
See document as it will print
Check formatting before printing patient forms
Ruler
Toggle ruler for margins and indents
Align text in forms and templates
Navigation Pane
Browse document by headings
Jump between sections in employee handbook
Knowledge Check
A healthcare office needs to email a patient information sheet that patients can view but cannot accidentally edit. Which file format is the best choice?
Correct! PDF (Portable Document Format) is the best choice for documents that need to be viewed but not edited. PDFs preserve the exact formatting of the original document and can be opened on virtually any device without Microsoft Word. In healthcare, PDFs are commonly used for patient handouts, consent forms, and any documents distributed electronically where accidental editing must be prevented.
Not quite. The best choice is .pdf (Portable Document Format). PDFs preserve exact formatting, can be opened on any device, and cannot be accidentally edited. This makes them ideal for patient handouts, consent forms, and compliance documents in healthcare settings.
Lesson 2.1 Summary
Microsoft Word is the essential document creation tool in healthcare — used for memos, referral letters, patient handouts, and compliance documents.
The Word interface includes the Ribbon, Quick Access Toolbar, Document Area, Status Bar, and Ruler.
Create documents from blank pages (Ctrl+N) or pre-designed templates (File > New) for consistency and efficiency.
Master text selection (double-click, triple-click, Ctrl+A, Shift+Click) and navigation (Ctrl+Home, Ctrl+F, Ctrl+G).
Use clipboard operations — Cut (Ctrl+X), Copy (Ctrl+C), Paste (Ctrl+V) — and rely on Undo (Ctrl+Z) as your safety net.
Save frequently with Ctrl+S, use Save As (F12) to preserve originals, and choose the right format (.docx for editing, .pdf for distribution).
Apply descriptive file naming and organized folder structures for efficient healthcare document management.